/**/ /**/

3.06.2014

Change Date and Time on Ubuntu

. 3.06.2014
2 comments

This simple tutorial is going to show Ubuntu beginners how to display and change date and time on Ubuntu Linux both Server and Desktop.

 To display data and time, use date command:

root@eddy:/home/eddy# date
Thu Mar  6 14:11:14 WIB 2014
root@eddy:/home/eddy#


To display calendar, use cal command:
root@eddy:/home/eddy# cal
     March 2014
Su Mo Tu We Th Fr Sa
                   1
 2  3  4  5  6  7  8
 9 10 11 12 13 14 15
16 17 18 19 20 21 22
23 24 25 26 27 28 29
30 31
root@eddy:/home/eddy#


To change date and time:
sudo date -s"7 march 2014 14:58"

checking the timezone file at
root@eddy:/home/eddy#  more /etc/timezone
Asia/Jakarta

So to change it just run
root@eddy:/home/eddy# sudo dpkg-reconfigure tzdata


And follow on screen instructions. Easy.

Read more »»

3.05.2014

Delete IPtables Rule

. 3.05.2014
0 comments

To list the rule list with numbers:

iptables -L  -n --line-numbers
 
[root@server ~]# iptables -L INPUT -n --line-numbers
Chain INPUT (policy ACCEPT)
num  target     prot opt source               destination         
1    DROP       tcp  --  0.0.0.0/0            0.0.0.0/0           tcp dpt:3306
2    ACCEPT     tcp  --  0.0.0.0/0            0.0.0.0/0           tcp dpt:555
3    ACCEPT     tcp  --  0.0.0.0/0            0.0.0.0/0           tcp dpt:80
[root@server ~]#
To delete a rule:
iptables -D  
 
[root@server ~]# iptables -D INPUT 1

Result:

[root@server ~]# iptables -L INPUT -n --line-numbers
Chain INPUT (policy ACCEPT)
num  target     prot opt source               destination         
1    ACCEPT     tcp  --  0.0.0.0/0            0.0.0.0/0           tcp dpt:555
2    ACCEPT     tcp  --  0.0.0.0/0            0.0.0.0/0           tcp dpt:80
[root@server ~]#


Read more »»

8.30.2013

How to disassemble HP G42 or Compaq Presario CQ42 laptop

. 8.30.2013
2 comments

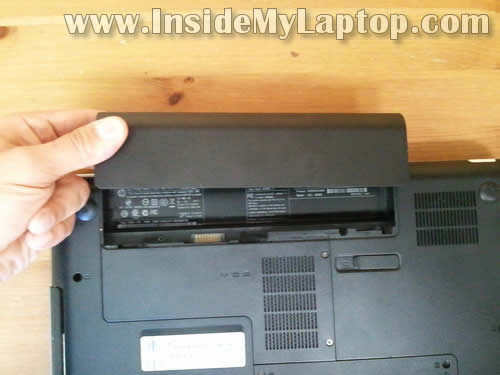
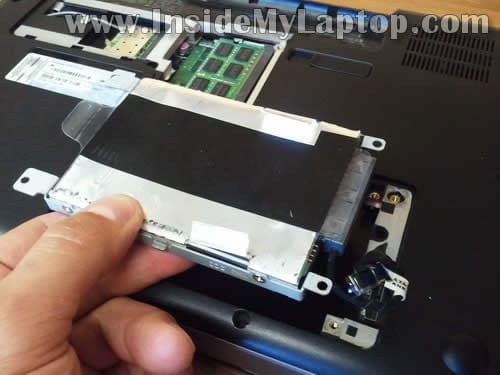
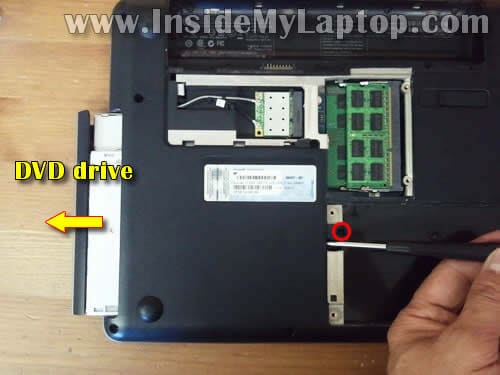
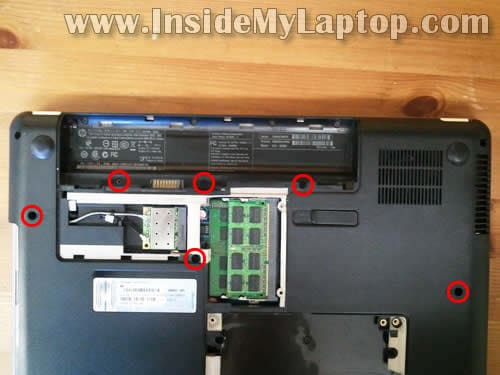
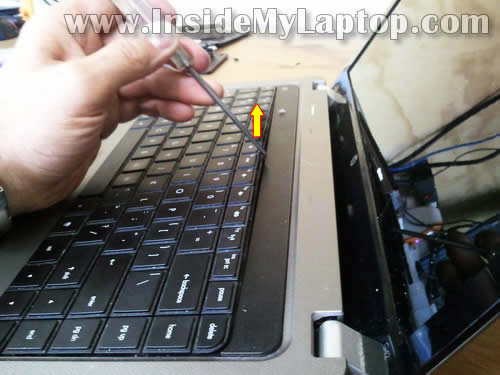
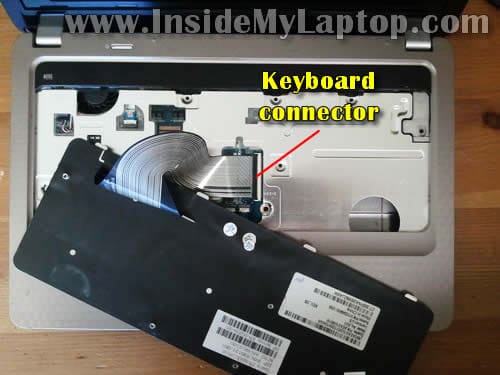
In the following guide I explain how to disassembly a HP G42 or Compaq Presario CQ42 laptop. Both models are very similar and all following disassembly steps should be the same or very similar for both models. In this particular case I’m taking apart a HP G42-303DX laptop. I will walk you though the following major laptop disassembly steps: STEP 1-6: Removing laptop hard drive, DVD drive. Accessing both memory modules. STEP 7-13: Removing laptop keyboard. STEP 14-20: Disconnecting and removing the palmrest assembly. STEP 21-27: Removing the display assembly STEP 28-33: Removing laptop motherboard. Accessing the cooling module and DC power jack. Make sure the laptop is turned off before you start taking it apart. STEP 1. Unlock and remove the main battery.
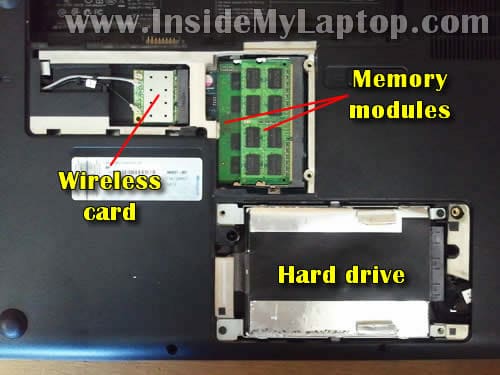
STEP 2. Loosen screws securing the memory cover and hard drive cover. Lift up and remove both covers. Under those covers you can access the following laptop components: - Wireless card. - Both memory modules. - Hard drive.
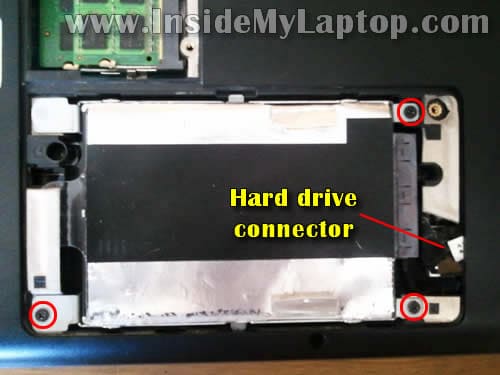
STEP 3. Remove screws securing the hard drive mounting bracket to the laptop case.
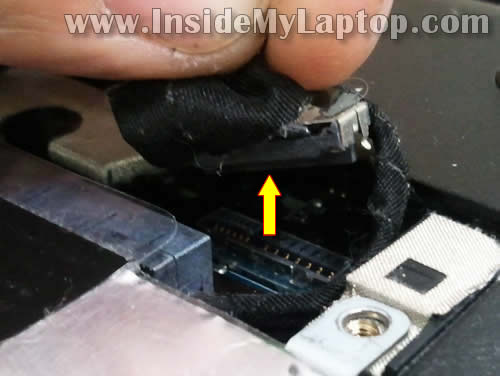
STEP 4. Unplug the hard drive cable connector from the motherboard.
STEP 5. Lift up and remove the hard drive assembly.
STEP 6. Remove one screw securing the DVD drive. Push the DVD drive from the laptop with a screwdriver. Pull and remove the DVD drive.
STEP 7. Remove screws securing the keyboard on the bottom of the laptop.
STEP 8. Insert a thin and sharp object between the keyboard and laptop case and carefully lift up the keyboard.
STEP 9. Lift up the upper side of the keyboard and turn it upside down. Place the keyboard on the palmrest.
STEP 10. Now you can access the keyboard cable connector which is located underneath the keyboard. In order to remove the cable it’s necessary to unlock the connector first.
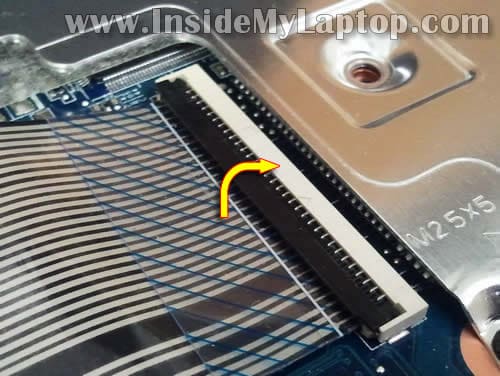
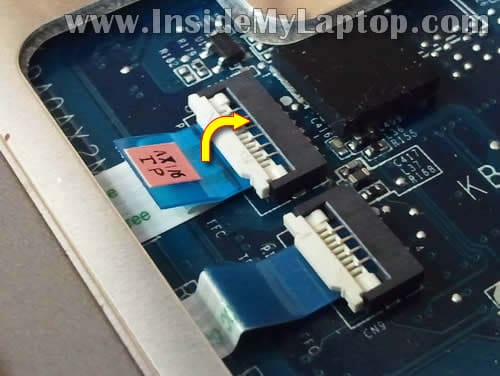
STEP 11. The keyboard cable is secured inside the connector by the retainer. Lift up the left side of the retainer with your fingernail. The retainer will open up at a 90 degree angle.
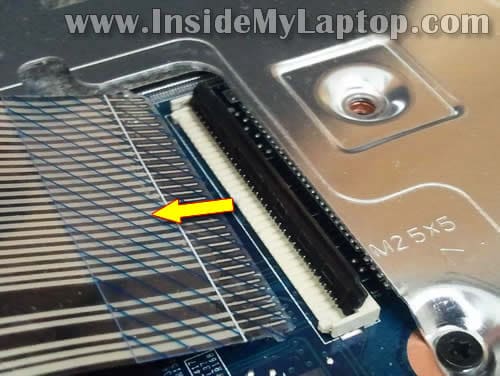
STEP 12. Now you can pull the keyboard cable from the connector.
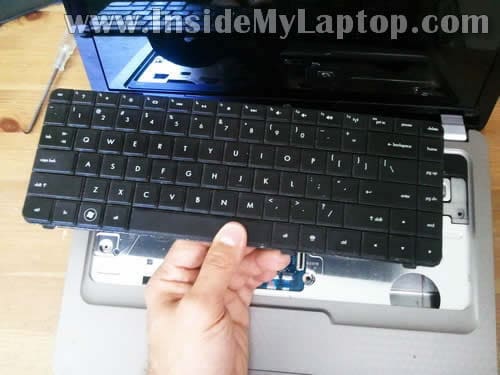
STEP 13. Remove the keyboard.
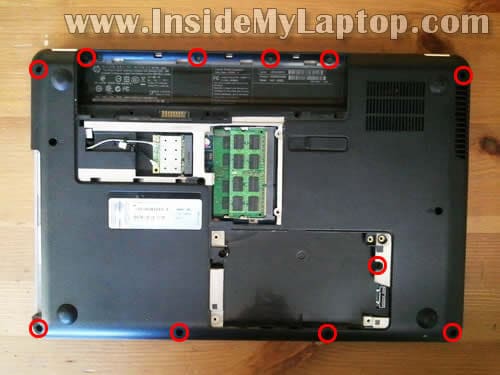
STEP 14. Remove screws from the bottom of the laptop.
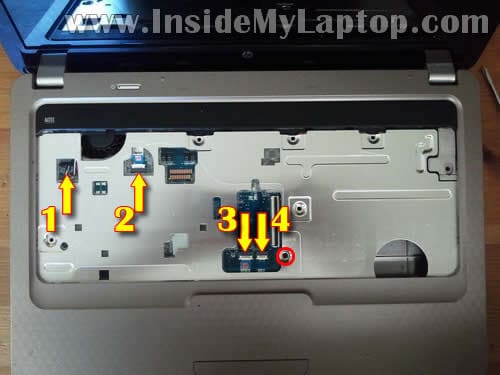
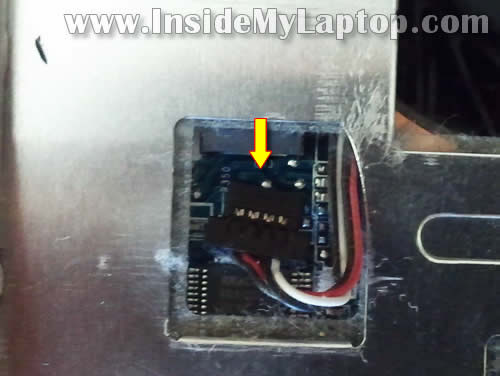
STEP 15. Remove one screw securing the palmrest assembly. Disconnect the following cables from the motherboard: 1. Speaker cable. 2. Power button board cable. 3. Touchpad cable. 4. Touchpad button board cable.
STEP 16. Disconnect the touchpad cable, touchpad button board cable and power button board cable the same way you disconnected the keyboard cable in the steps 11-12. Unlock the connector retainer.
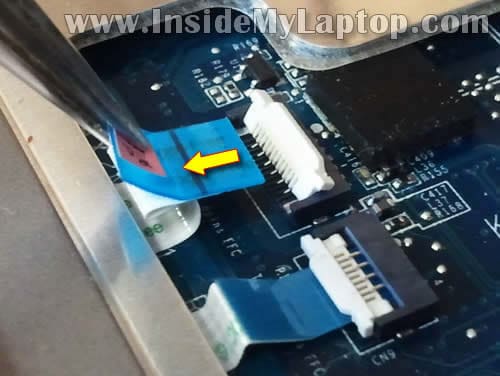
STEP 17. Pull the cable from the connector.
STEP 18. The speaker cable has a regular male-female type connector. Unplug the male part from the female part. Do not pull by the wires. Disconnect it by the connector edges.
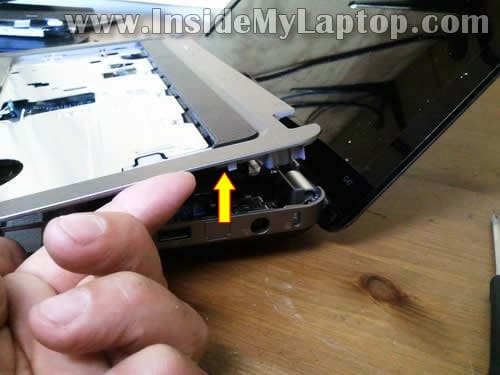
STEP 19. Start separating the palmrest assembly from the laptop bottom cover.
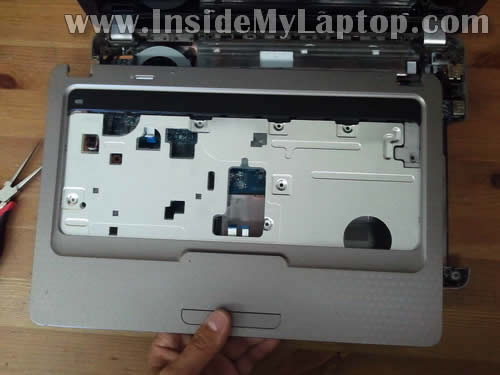
STEP 20. Remove the palmrest assembly.
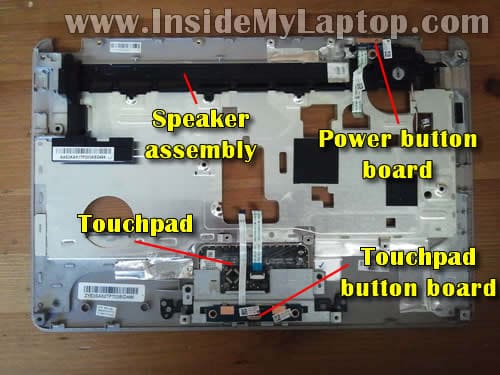
On the bottom side of the palmrest assembly you can access the following laptop components: - Speaker assembly. - Power button board. - Touchpad. - Touchpad button board.
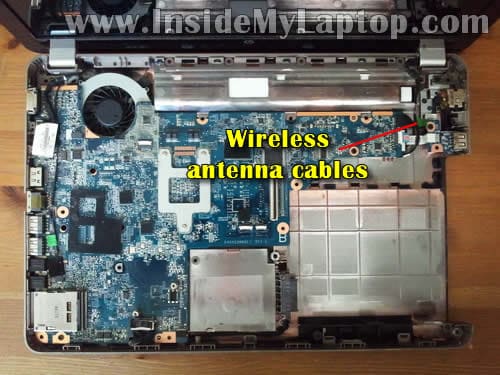
STEP 21. Start removing the display assembly with disconnecting and unrouting the wireless card antenna cables.
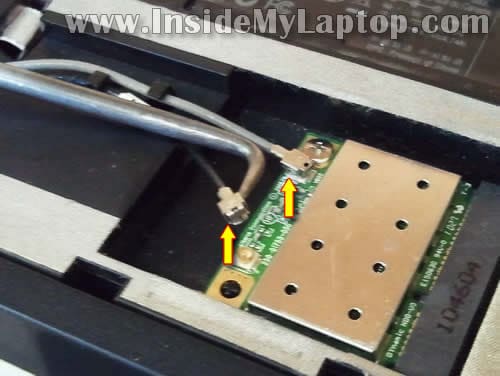
STEP 22. Disconnect both antenna cables from the wireless card.
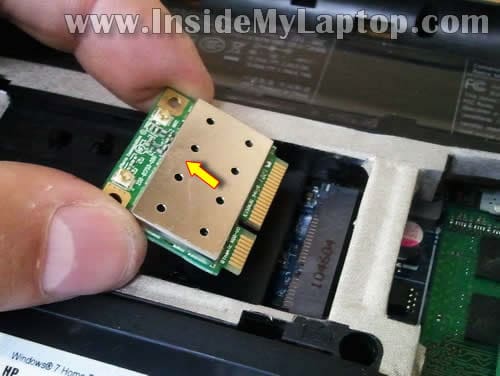
STEP 23. Remove one screw securing the wireless card. Pull the wireless card from the slot. NOTE: it’s necessary to remove the wireless card in order to remove the motherboard.
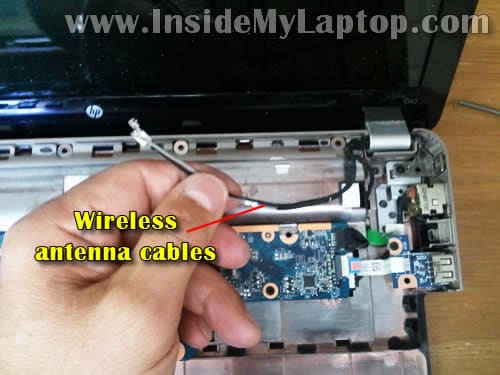
STEP 24. Pull the wireless card antenna cables though the opening.
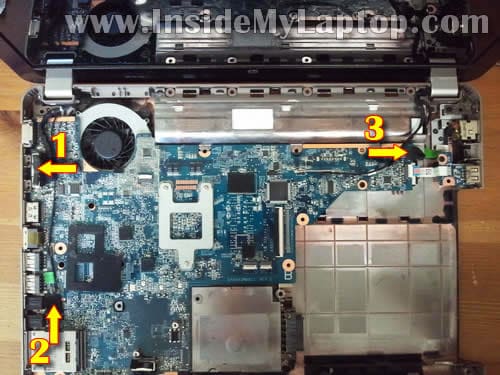
STEP 25. Disconnect the following display cables from the motherboard: 1. Video cable. 2. Microphone cable. 3. Web camera cable.
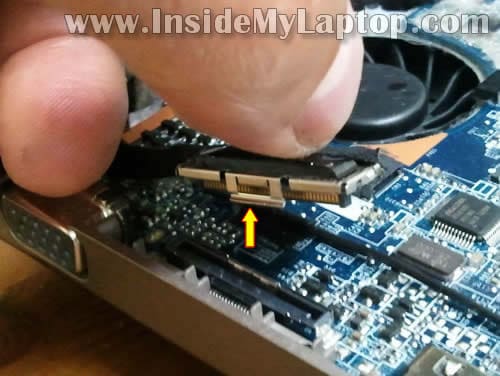
Lift up the video cable connector by the black belt and disconnect it from the motherboard.
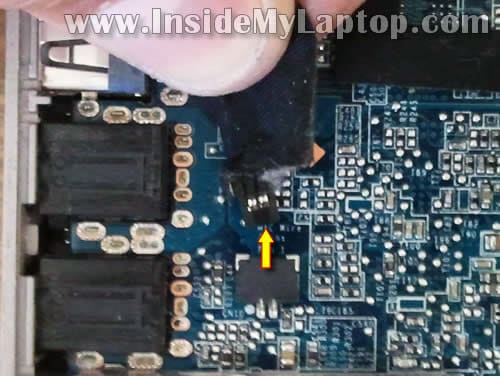
Disconnect the microphone cable and web camera cable same way you disconnected the speaker cable in the step 18.
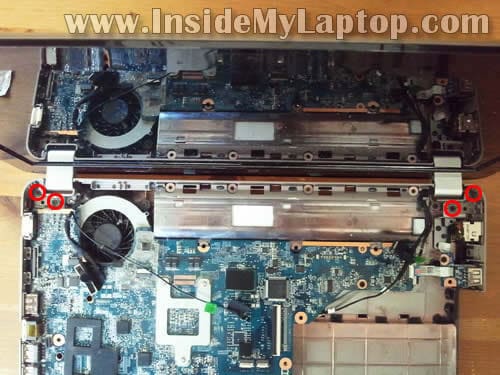
STEP 26. Remove four screws securing the display hinges.
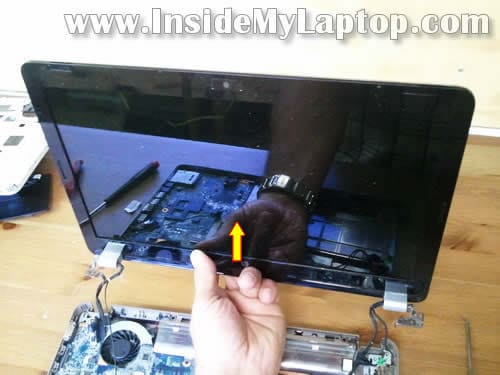
STEP 27. Lift up and remove the display assembly.
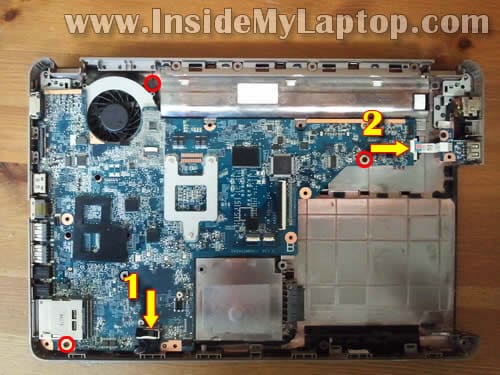
STEP 28. Remove three screws securing the motherboard. Disconnect the following cables from the motherboard: 1. Optical drive (DVD drive) cable. 2. USB board cable.
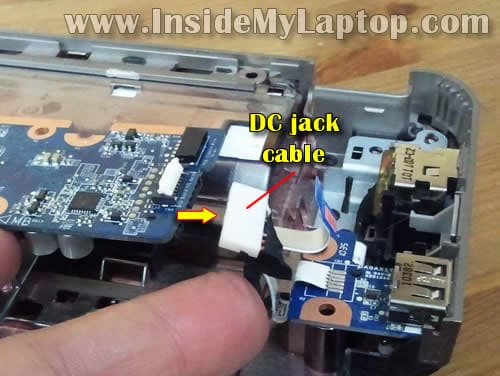
STEP 29. Lift up the right side of the motherboard and disconnect the DC jack harness cable.
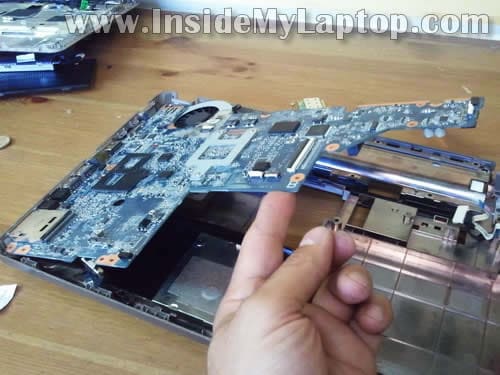
STEP 30. Lift up the right side of the motherboard and start removing it from the laptop bottom cover.
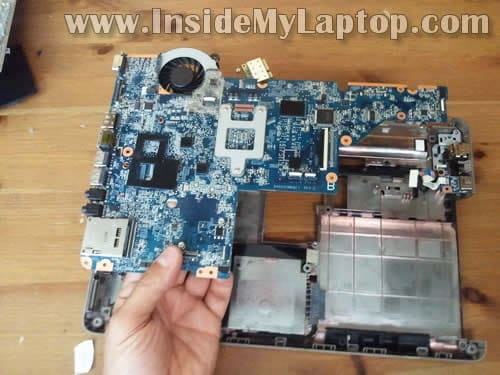
STEP 31. Remove the motherboard.
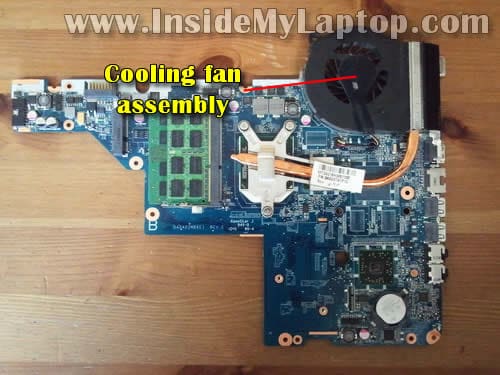
STEP 32. The cooling fan assembly (fan and heatsink) is mounted on the bottom side of the motherboard.
STEP 33. The DC power jack is mounted in the upper right side of the bottom cover.
Sumber Berita www.insidemylaptop.com

Read more »»

10.10.2012

Penggunaan Crontab Scheduler di Ubuntu

. 10.10.2012
1 comments

Apa itu cron / crontab ? Crontab adalah aplikasi daemon (berjalan dibalik layar) yang digunakan untuk menjalankan tugas yang dijadwalkan pada suatu waktu di sistem operasi linux. Setiap user di sistem yang memiliki file crontab, mengijinkan file tersebut untuk melakukan suatu aksi yang telah dispesifikasikan sesuai waktu yang telah ditentukan. Crontab biasa digunakan untuk membuat backup secara otomatis, sinkronisasi files, dl

1. Install crontab

Buat yang belum diinstall crontab-nya, cara install nya adalah :

sudo apt-get install cron

2. Melihat aktifitas crontab

Untuk melihat schedule yang sedang berjalan di sistem Anda :

sudo crontab -l

3. Mengedit cron jobs

sudo crontab -e

4. Format penulisan cron

Format penulisan crontab ditulis dengan format seperti ini :

* * * * * /home/eddy/script.sh

Penjelasan :

5 bintang (*) diatas merepresentasikan bagian2 format tanggal yang berbeda, urutannya sebagai berikut :

1. (* pertama) : menit (isian : 0 – 59)
2. (* kedua) : jam (isian : 0 – 23)
3. (* ketiga) : hari dari bulan / tanggal (isian : 1 – 31)
4. (* keempat) : bulan (isian : 1 – 12)
5. (* kelima) : hari dari minggu (isian : 0 – 6) –> 0 = minggu

Contoh :

40 5 * * * /sbin/reboot

Read more »»

6.28.2012

How to run 16 bit applications in 64 bit OS

. 6.28.2012
1 comments

Pada saat ini, semakin banyak produsen komputer seperti Dell atau HP menawarkan system operasi versi 64-bit secara default/bawaan laptop bahkan pada perangkat yang ditujukan untuk penggunaan di rumah dan pengguna bisnis kecil. tentu saja dengan kondisi seperti ini dimana kita di tuntut untuk mengikuti perkembangan teknologi yang sangat cepat, perkembangan teknologi ini tidak selalu berjalan mulus, jelas saja bagi yang masih menggunakan aplikasi 16 bit tentu saja tidak dapat berjalan di 64 bit, jadi bagai mana solusi nya? apalagi jika aplikasi tersebut berhubungan dengan sebuah pekerjaan.

Pesan error yang muncul ketika kita mencoba menjalankan aplikasi, pada pesan tersebut di tegaskan bahwa aplikasi yang akan kita coba untuk jalan kan tidak cocok pada system operasi 64 bit, jadi solusi untuk masalah ini kita butuh pihak ketiga software Dosbox cara kerja tool ini hampir mirip seperti tool-tool emulator lain nya.bagaimana cara menjalankan nya?. saya contohkan, saya ingin menjalan kan sebuah tool, yang lokasi atau tempat saya menyimpan tool tersebut ada di "C:\Users\Administrator.WIN-U6757BMP6RQ\Desktop\RTA600\RTA600" tool yang saya ingin jalan kan RTA600.EXE berada di dalam folder tadi. sebelum nya kita harus configurasi Dosbox terlebih dahulu silahkan buka Dosbox option , akan muncul sebuah file text, dimana kita harus menuliskan sedikit tambahan scrip tepat di paling bawah file text tersubut. contoh : mount d "C:\Users\Administrator.WIN-U6757BMP6RQ\Desktop\RTA600\RTA600" d: RTA600.EXE Silahkan di sesuaikan dengan kasusu dan permasalahan yang sobat alami.

Read more »»

5.23.2012

Cinta Versi Anak IT

. 5.23.2012
1 comments

Flowchart Cinta

Jika cinta itu OOP ,
Maka, cintaku padamu bagaikan sebuah kelas yang extend ke kelas hati. dimana kelas itu memiliki properties dengan atribute final dengan prefilages private , tidak akan berubah-ubah value nya sampai akhir waktu.

Jika cinta itu adalah Tipe Data ,
Maka, cintaku padamu adalah boolean yang akan selalu kupertahankan tetap true .

Jika cinta itu Method ,
Maka, method itu adalah sebuah method yang bersifat rekursif , yang tidak akan pernah berhenti di eksekusi jika status hidupku belum mati.

Jika cinta itu Object ,
maka, fungsi destroy(); object tidak akan pernah bisa dipakai. karena sudah di override dengan fungsi looping didalamnya.

Jika cinta itu Array ,
maka, cintaku padamu tak pernah empty jika di unset() .

Jika cinta itu Java ,
maka, kemurnian code cinta ini melebihi kelas manapun yang pernah dibuat. kelas cintaku padamu tidak akan pernah di akses oleh kelas-kelas lain dengan cara apapun.

Jika cinta itu php ,
maka, cintaku padamu tidak akan berhenti ketika seseorang asing mencoba menambahkan code die(); karena fungsi itu sudah aku hapus dari core php yang ada.

Jika cinta itu Sistem Operasi ,
Maka, tak akan kubiarkan cinta ini terkena virus yang bisa mengganggu stabilitas dan eksistensinya sebagai sistem operasi yang tangguh . kalau perlu akan kugunakan sistem operasi yang kebal virus .

Jika cinta itu Algoritma ,
Maka, cinta hanyalah logika.

Jika cinta itu Sequential ,
Maka tidak akan ada syarat apapun didalam IF ..Karena cinta itu buta..

Jika cinta itu Router ,
Maka aku akan selalu masuk global conf mode untuk membuatmu tetap ter configure .

Jika cinta itu LOOPING,
while (Love)
{
withYouForever();
protectYou();
lovingYou();
makeYouHappy();
eternalLove();
}


Sumber : Google

Read more »»
 

MY BANNER

eddie
Racun dunia is proudly powered by Blogger.com | Template by o-om.com